mirror of
https://github.com/jkriege2/JKQtPlotter.git
synced 2025-02-24 09:21:46 +08:00
+ CMAKE now properly adds the Build-type when building libraries + removed some more compiler warning |
||
|---|---|---|
| .. | ||
| barchart_and_lib.pro | ||
| barchart.cpp | ||
| barchart.pro | ||
| CMakeLists.txt | ||
| README.md | ||
Example (JKQTPlotter): Simple barchart
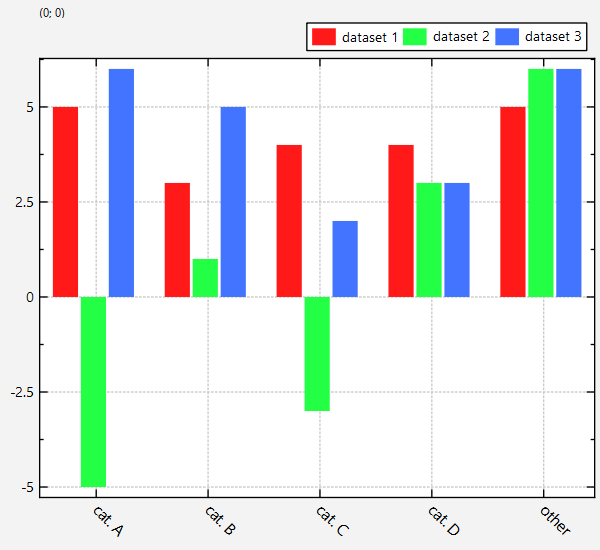
This project (see barchart simply creates a JKQTPlotter widget (as a new window) and adds several barcharts. They are ordered in groups.
The source code of the main application is (see barchart.cpp:
#include <QApplication>
#include "jkqtplotter/jkqtplotter.h"
#include "jkqtplotter/graphs/jkqtpbarchart.h"

#define Ndata 5
int main(int argc, char* argv[])
{
    QApplication app(argc, argv);

    // 1. create a plotter window and get a pointer to the internal datastore (for convenience)
    JKQTPlotter plot;
    plot.getPlotter()->setUseAntiAliasingForGraphs(true); // nicer (but slower) plotting
    plot.getPlotter()->setUseAntiAliasingForSystem(true); // nicer (but slower) plotting
    plot.getPlotter()->setUseAntiAliasingForText(true); // nicer (but slower) text rendering
    JKQTPDatastore* ds=plot.getDatastore();

    // 2. now we create data for three simple barchart
    QString L[Ndata]={  "cat. A", "cat. B", "cat. C", "cat. D", "other"};
    double  X[Ndata]={        1,        2,        3,        4,       5};
    double Y1[Ndata]={        5,        4,        3,        4,       5};
    double Y2[Ndata]={       -5,       -3,        1,        3,       6};
    double Y3[Ndata]={        6,        2,        5,        3,       6};

    // 3. make data available to JKQTPlotter by adding it to the internal datastore.
    //    Note: In this step the data is copied (of not specified otherwise)
    //    the variables columnX and columnY... will contain the internal column ID of the
    //    newly created columns with names "x" and "y..." and the (copied) data from X
    //    and Y...
    size_t columnX=ds->addCopiedColumn(X, Ndata, "x");
    size_t columnY1=ds->addCopiedColumn(Y1, Ndata, "y1");
    size_t columnY2=ds->addCopiedColumn(Y2, Ndata, "y2");
    size_t columnY3=ds->addCopiedColumn(Y3, Ndata, "y3");

    // 4. create graphs in the plot, which plots the dataset X/Y1, X/Y2 and X/Y3:
    JKQTPBarVerticalGraph* graph1=new JKQTPBarVerticalGraph(&plot);
    graph1->setXColumn(columnX);
    graph1->setYColumn(columnY1);
    graph1->setTitle(QObject::tr("dataset 1"));
    JKQTPBarVerticalGraph* graph2=new JKQTPBarVerticalGraph(&plot);
    graph2->setXColumn(columnX);
    graph2->setYColumn(columnY2);
    graph2->setTitle(QObject::tr("dataset 2"));
    JKQTPBarVerticalGraph* graph3=new JKQTPBarVerticalGraph(&plot);
    graph3->setXColumn(columnX);
    graph3->setYColumn(columnY3);
    graph3->setTitle(QObject::tr("dataset 3"));


    // 5. add the graphs to the plot, so it is actually displayed
    plot.addGraph(graph1);
    plot.addGraph(graph2);
    plot.addGraph(graph3);

    // 6. now we set the graphs, so they are plotted side-by-side
    //    This function searches all JKQTPBarVerticalGraph in the current
    //    plot and sets their shift/scale so they form a nice plot with
    //    side-by-side groups
    graph1->autoscaleBarWidthAndShift(0.75, 1);

    // 7. data is grouped into 5 numbere groups (1..5), but we also have string
    //    labels for these groups (stored in L). In order to display these labels,
    //    we have to tell the x-Axis to use these special labels:
    plot.getXAxis()->addAxisTickLabels(X, L, Ndata);
    //    also we can rotate the labels a bit (by 45 degree), so they fit better
    plot.getXAxis()->setTickLabelAngle(45);
    plot.getXAxis()->setTickLabelFontSize(12);

    // 8. finally we move the plot key/legend to the outside, top-right
    //    and lay it out as a single row
    //    NOTE: plot is a descendent of QWidget, which uses an internal object of
    //          type JKQTBasePlotter, which does the actual plotting.
    //          So many properties of the plot are only available in this internal
    //          object, which you can access by plot.getPlotter().
    plot.getPlotter()->setKeyPosition(JKQTPKeyOutsideTopRight);
    plot.getPlotter()->setKeyLayout(JKQTPKeyLayoutOneRow);

    // 9 autoscale the plot so the graph is contained
    plot.zoomToFit();

    // show plotter and make it a decent size
    plot.show();
    plot.resize(600,400);

    return app.exec();
}
The result looks like this:
